
The Art of Timekeeping: Exploring the World of Luxury Watches
Welcome, watch connoisseurs and Rolex collectors, to another chapter in your horological journey. While the movement inside your Rolex is a mechanical masterpiece, the way it wears on your wrist is equally important. A perfect fit not only enhances comfort but also respects the craftsmanship of the timepiece. Today, we delve into the subtle art of resizing a Rolex bracelet, a process that requires care, precision, and expertise.
The Importance of a Perfect Fit
Every Rolex watch is a balance of form and function. Whether you're wearing a rugged Submariner or an elegant Day-Date, how your watch fits can affect its longevity, wearability, and overall presence. A bracelet that’s too loose risks unnecessary wear; one that’s too tight can be uncomfortable and damage the links or clasp. Proper sizing is not just an adjustment, it's an extension of the watchmaking art.
Rolex Bracelet Types: Know Your Links
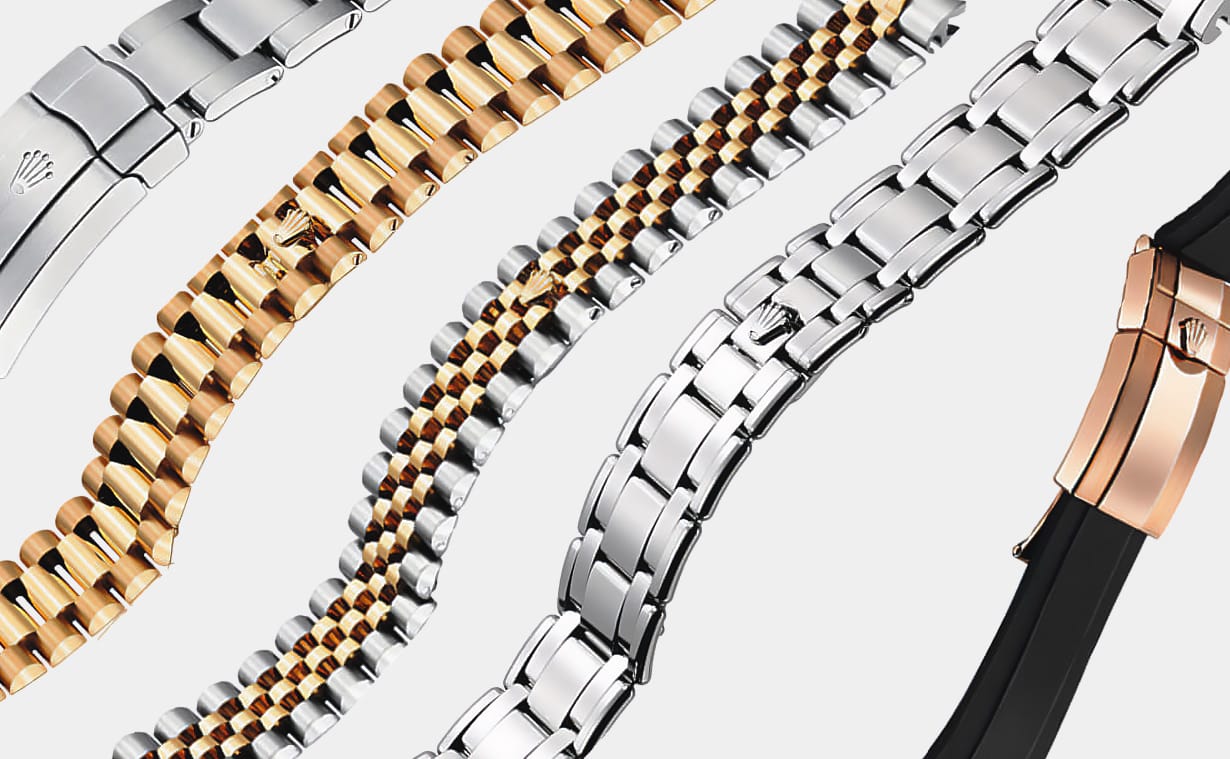
Each Rolex model carries its own distinct bracelet design. Understanding which bracelet you have is the first step toward proper resizing:
|
Bracelet |
Key Characteristics |
Commonly Found On |
|---|---|---|
|
Oyster |
Flat, solid three-piece links |
Submariner, Explorer, Daytona |
|
Jubilee |
Five-piece links, flexible and elegant |
Datejust, GMT-Master II |
|
President |
Semi-circular three-piece links, solid gold |
Day-Date |
|
Oysterflex |
Elastomer with metal blade inside |
Yacht-Master, Cosmograph Daytona |
Each bracelet demands a different approach to resizing. While some utilize screws, others may include proprietary Rolex extensions such as the Easylink comfort system or Glidelock clasp.
The Professional Approach to Resizing a Rolex
While certain minor adjustments such as activating the Easylink can be done without tools, most resizing tasks should be performed using Rolex-specific instruments to avoid damage.
Tools of the Trade:
- 1.6mm Rolex screwdriver: Used for screw-in links (most Oyster and Jubilee bracelets).
- Non-marring tweezers: For handling tiny screws and components.
- Microfiber mat or case holder: To protect the case and bracelet from scratches.
- Magnification loupe: For precise visual alignment.
Steps Involved:
- Secure the Watch: Always stabilize the watch face-down on a soft surface.
- Remove Equal Links: Take links equally from both sides of the clasp to maintain symmetry.
- Use Correct Torque: Over-tightening screws can damage threads — precision is key.
- Inspect and Clean: After resizing, inspect the bracelet and clean any debris or oils.
To begin resizing your Rolex bracelet, first prepare a clean, well-lit workspace. Lay the watch face-down on a soft microfiber cloth or padded case holder to protect the case and crystal from scratches. Determine how many links need to be removed for an ideal fit by trying the watch on your wrist. For balance and comfort, always remove an equal number of links from both sides of the clasp.
Once you’ve identified the removable links — typically marked by small screws on the side of the bracelet — use a 1.6mm Rolex screwdriver to carefully unscrew them. Work slowly and apply steady pressure to avoid stripping the threads. Remove the necessary links, being mindful to keep all parts (screws, links, pins) safely contained in a small tray or container.
After removing the desired links, reconnect the bracelet by aligning the remaining links and reinserting the screws. Tighten them securely, but be cautious not to over-tighten, which could damage the threading. Use a magnification loupe to double-check the alignment and tightness of each screw, ensuring the bracelet is secure and flush.
Once reassembled, gently clean the bracelet with a soft cloth to remove any smudges or debris. Try the watch on again to confirm the fit — it should feel snug but not tight, with just enough movement to slide slightly on the wrist. If your Rolex features an Easylink extension or Glidelock clasp, use these for final micro-adjustments to achieve a perfect fit.
Why DIY Can Be Risky
Rolex watches are finely tuned instruments. One misaligned screwdriver or dropped screw can result in scratches, stripped threads, or worse — compromising the integrity of your timepiece.
Common risks of DIY resizing include:
- Scratched polished surfaces
- Misplaced or lost screws
- Unbalanced bracelet fit
- Damage to proprietary parts like Easylink or Glidelock
For this reason, we strongly advise professional resizing, especially for new collectors or high-value models.
Resizing Rolex Rubber Straps (Oysterflex)
The Oysterflex bracelet, found on models like the Yacht-Master and Daytona, is not adjustable in the traditional sense. Instead, it features fixed-size segments that must be swapped out — not trimmed.
Resizing requires:
- Accurate wrist measurements
- Ordering the correct strap segment sizes
- Special tools to install without damaging the titanium blade inside
For Oysterflex straps, resizing requires replacing entire strap segments with different sizes rather than adjusting traditional links. This process involves precise wrist measurement and the use of specialized tools. Due to the risk of damage, Oysterflex sizing should always be handled by a Rolex-certified technician.
Attempting to adjust these straps at home can lead to permanent damage.
Crowning the Experience: The Final Step in Wearing a Rolex Right
Resizing a Rolex bracelet isn’t just a technical adjustment — it’s a final touch that completes the bond between the timepiece and its wearer. From the robust links of the Oyster to the elegant curvature of the President or the high-performance Oysterflex, each bracelet is designed with both form and function in mind.
Achieving the perfect fit enhances more than just comfort; it upholds the legacy of precision and craftsmanship that defines every Rolex. Whether you're making minor adjustments or opting for a full professional resizing, it's a step that deserves attention, expertise, and respect.
***Image credit: Photo by Everest Team***
